About skin colour authoring
Part of our MeModel development process involves skin colour matching. We have to match our 3D avatars to a photographic reference. We have attempted to do this automatically in the past, but as the lighting process became more complex, the results were no longer good and it required a lot of manual tweaking. In effect, we needed to manually author the skin colour, but writing parameters by hand and trying them out one at a time is a tedious process. That’s why we decided to create an interactive tool so we could see the result immediately and iterate quickly.
The first choice we made was the platform: the browser. If we wrote this tool for the web, then we could share it immediately with remote teams. It’s a zero-install process, and therefore painless for the user.
We wrote a prototype that would use a high-resolution 2D canvas, and transform all the pixels in simple for-each loops. However, this was far from interactive. For our images, it could take a couple of seconds per transform, not very pleasant when adjusting parameters with sliders. You could try to parallelise those pixel loops using Javascript workers, for a 2 or 3-fold speed increase. But the real beast for local parallel processing is your GPU, giving us in this case more than a 100-fold speed increase.
So we decided to make the canvas a WebGL canvas. WebGL gives you access to the GPU in your machine, and you can write small programs for it to manipulate all pixels of the image in parallel.
Quick introduction to rendering
Forward rendering
The traditional programmable rendering pipeline is something that in the computer graphics jargon is referred to as forward rendering. Here’s a visual summary,

Forward rendering pipeline
Before you can render anything, you need to prepare some data buffers with your vertex positions and any parameters you may need, which are referred to as uniforms. These buffers need to be in an area of memory that your GPU can access. Depending on your hardware, that area could be the same as the main memory, or a separate graphics memory. WebGL, based on OpenGL ES 2.0 API, has a series of functions to prepare this data.
Once you have the data ready, then you have to provide two programs to the GPU, a vertex shader and a fragment shader. In OpenGL/WebGL, these programs are written in GLSL, and compiled during run time. Your vertex shader will compute the final position and colour of your vertices. The GPU will rasterize the vertices for you (this part is not programmable), which is the process of computing which pixels the given geometry will cover. Then, your fragment shader program will be used to decide the final pixel colour on screen. Notice that all the processing in both the vertex and pixel/fragment shaders is done in parallel, so we write programs that know how to handle one data point. There’s no need to write loops in your program to apply the same function to all the input data.
A traditional vertex shader
There are basically two things that we compute in the vertex shader:
- Space transforms. This is how we find the position of each pixel on screen. It’s just a series of matrix multiplications to change the coordinate system. We pass these matrices as uniforms.
- Lighting computations. This is to figure out the colour of each vertex. Assuming that we are using a linear colour space, it is safe to assume that, given 2 vertices, the interpolation of pixel colours that happens during rasterization is correct because irradiance is additive.

A traditional vertex shader
Both the space transforms and lighting computations can be expensive to compute, so we prefer doing it per vertex, not per pixel, because there are usually fewer vertices than pixels. The problem is that the more lights you try to render, the more expensive it gets. Also, there’s a limit of the number of uniforms you can send to the GPU. One solution to these issues is deferred rendering.
Deferred rendering
The idea of deferred rendering is simple: let’s defer the lighting & shading computation until a later stage. It can be summarized with this diagram,

Deferred rendering pipeline
Our vertex shader will still compute the final position of each vertex, but it won’t do any lighting computation. Instead, we will output any data that will be needed for lighting later on. That’s usually just the depth (distance from the camera) of each pixel, and the normal vectors. If necessary, we can reconstruct the full 3D position of each pixel in the image, given its depth and its screen coordinates.
As I mentioned earlier, irradiance is additive. So now we can have a texture or a buffer where to store the final irradiance value, and just loop through all the lights in the scene and keep summing the pixel values in the final texture.
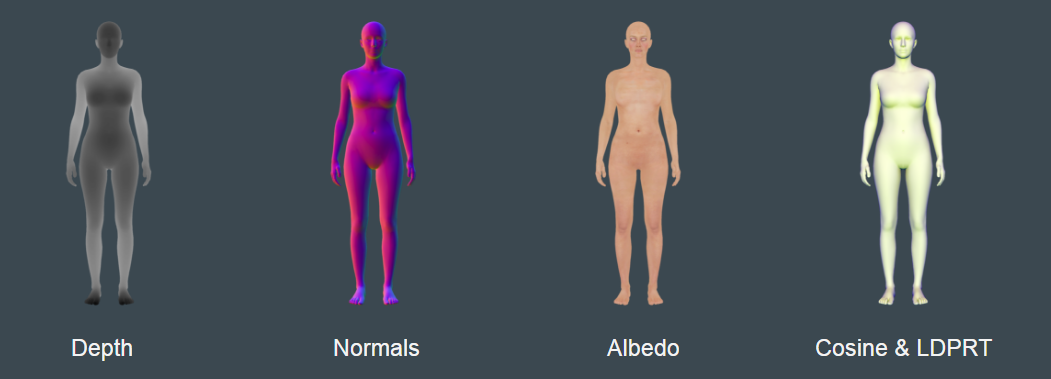
Skin colour authoring tool
If you followed so far, you may see where this is going. I introduced deferred rendering as the process of deferring lighting computation to a later stage. In fact, that later stage can be done in a different machine if you wanted to. And that’s precisely what we have done. Our rendering server does all the vertex processing, and produces renders of the albedo, normals, and some other things that we’ll need for lighting. Those images will be retrieved by our WebGL application, and it will do all the lighting in a pixel shader. The renders we generate look like this,

MeModel GBuffer
Having these images generated by our server, the client needs to worry only about lighting equations, and we only need a series of sliders that connect directly to the uniforms we send to the shader to produce a very responsive and interactive tool to help us author the skin tones. Here’s a short video of the tool in action,
The tool is just about 1000 lines of pure Javascript, and just 50 lines of shader code. There are some code details in the slides here:
(These slides were presented in the Cambridge Javascript meetup)
Summary
Javascript & WebGL are great for any graphic tool (not only 3D!): being in the web means zero-install, and being in WebGL should mean it gives you interactive speeds. Also, to simplify the code of your client, remember that you don’t need to do all the rendering in the client. Just defer the things that need interaction (lighting in our case).